An HTML page is a plain text file. So, to write HTML, you can use any plain text editor. You can use visual editors too.
Visual Editors:
Visual Editors such as Dreamweaver have two views – Design view and Code view. Design view is much like the word processor (ex. MS Word) which allows you to create the web page without showing the actual HTML codes. But, in normal code view you can write raw HTML codes which is great for understanding it.
Plain Text Editors:
If you’re a windows user, NotePad comes as default text editor in your system. This is a great editor for beginner HTML learners.
If you’re a MAC user, you can use TextEdit which is the default text editor there. You can also use TextWrangler which can be downloaded free at http://www.barebones.com/products/textwrangler/
If you’re a Linux user, use vi, or vim.
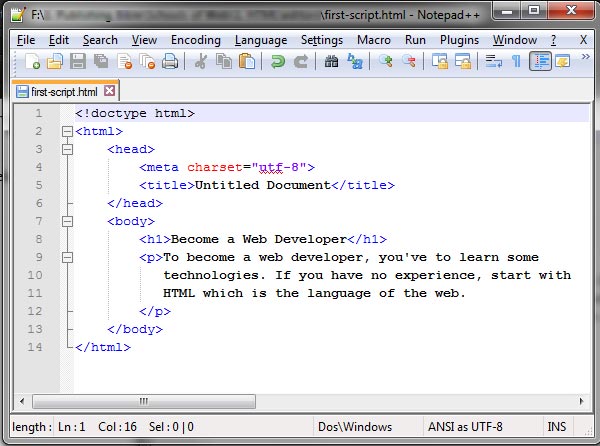
For both Windows and MAC Users, notepad++ is a great text editor for beginners. It has few benefits over the default editors. This editor shows the line number. You can download it here – http://notepad-plus-plus.org/download/
Which Editor is the best for the beginners?
To become a proficient in HTML, you have to understand its codes at first. We strongly recommend the normal text editor over the visual editors for the first time HTML learners. It will force you to write the HTML codes by hand.
Steps to create your first HTML page –
Here, you’ll see how to write a HTML document in Notepad++ editor. If you’ve not installed it yet, download from the above link and install in your computer.
- Open the NotePad++ editor
Start > All Programs > Notewpad++ > Notepad++ - Write some HTML code
Write the following HTML code in the editor as seen the following picture-

- Save the page
You can save the above page with any name you want. But, make sure that the extension is either .html (recommended) or .htm. - Open the file
If you double click the file, it will open in your default browser. The following image shows how the above HTML code will look in firefox browser.

| Next Lesson: HTML Elements ›› |

